VFX Pulls and ACES Color Management
Cameras are able to capture high dynamic range images, containing a huge gamut of colors and multiple stops of exposure. This is known as scene-referred data because it captures the light values of the physical scene the camera was pointing at. However, displays are not as capable as cameras in terms of dynamic range and color. So in order to appear correctly on a display, some of the image data must be thrown away in order to fit or limit the data to the range of the particular display, whether that’s a computer monitor, a TV, an HDR display, or a movie projector. This is known as display-referred or display-encoded data where the data is limited to fit onto the particular display. Our preferred format for these scene-referred files is ACES, the Academy Color Encoding System. If you are unfamiliar with ACES, the following video, created by Netflix Studios, offers a great overview of the advantages of an ACES color managed workflow for filmmakers.
For a VFX pull, the camera RAW files need to be debayered and saved out in a format that preserves the full quality and dynamic range of the original camera RAW files in scene-referred space. The basic idea is that VFX returns the ungraded plate to DI, with the VFX added, returning the full quality film plate back as if it were filmed that way. This ensures that the master contains all the original camera data so it can accommodate any delivery medium or targeted display type.
Our preferred format for these scene-referred files is ACES, the Academy Color Encoding System. Specifically for VFX work, the two main reasons we use ACES are quality and control. First, ACES ensures that your film footage stays at the absolute highest dynamic range and color fidelity. As shown in the graphic below, the ACES interchange format, known as ACES2065-1 (AP0) has a wide gamut color space that contains every color visible to the human eye, meaning it can accommodate any delivery medium or targeted display type, now and into the future.
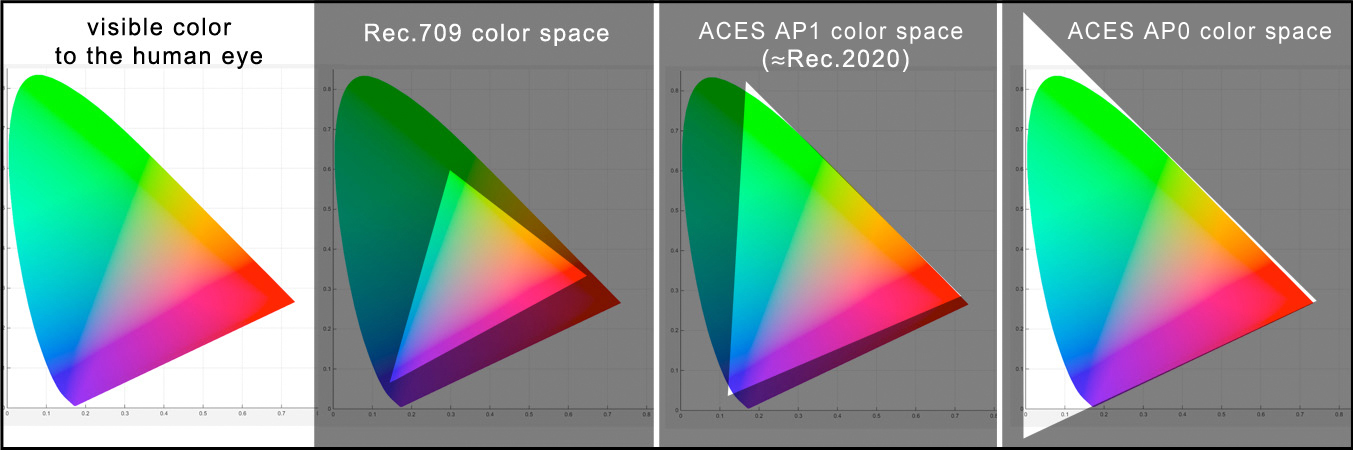
Additionally, these are 16-bit float files with a dynamic range of over 30 exposure stops. As a point of comparison, the most of any digital cinema camera RAW file is 15 stops. So ACES files far exceed the dynamic range of any camera RAW file, at a file size that is smaller than a DPX! The second benefit is consistency and control. Unlike DPX files, which can have any number of log color spaces with no way of knowing which one you have, because the ACES image format represents an industry (SMPTE) standard, the whole image pipeline is controlled and managed, taking out the guesswork and avoiding mistakes and chaos when passing images between facilities.
VFX Pull Requirements
Debayering to OpenEXR. VFX pulls should be debayered from the original RAW camera files and exported in the ACES file interchange format (ACES2065-1) with PIZ lossless compression.
- Resolution: UHD 4k is the maximum resolution we can accommodate at this time.
- No more than 12 frame handles on each shot (total24 frames)
- Naming Syntax: File sequences must have a dot (.) delimiter before and after the numbering.
RIGHT: File_name.0001.exr WRONG: File_name0001.exr - Format: OpenEXR 16-bit half float
- Compression: PIZ lossless compression
- Color Space: ACES2065-1 (AP0)
- All color grades disabled
- ACES Gamut Compression disabled
This should be done in a software that supports an ACES color managed workflow and can properly debayer the camera RAW files. A great choice for the filmmaker on a budget is DaVinci Resolve. The free version has a resolution limit of Ultra HD (3840 x 2160), but the full software is just $300 dollars for a permanent license.
The guide below will walk you through the process:
VFX pulls should include:
-
Color Reference VFX pulls should always include dailies color reference QuickTimes representing how the footage is intended to look in the dailies grade sent to offline editorial. This is so we can ensure a roundtrip from vfx to editorial of the proxy media, so that the delivered VFX proxy media can drop in seamlessly with the edit.
-
The show look If there is a show look LUT (typically a cube LUT, along with the working color space used) and/or per shot CDL files used in the dailies process these should be given to VFX. This is to help ensure that editorial proxies of VFX shots can easily be matched to the original dailies proxy in editorial. See the above VFX Pulls with Resolve link for details on exporting LUTs from Resolve.
-
CDL Shot Grades Any per-shot grades (for example normalizing the exposure for continuity in a sequence) done by the DIT for on set dailies should be passed to VFX in the form of ASC-CDL files. These are typically included in the EDL. This is likewise to help ensure that editorial proxies of VFX shots can easily be matched to the original dailies proxy in editorial. Here’s a helpful video explaining this as well as this video which provides a detailed walk-through this color pipeline in Davinci Resolve.
-
Framing Charts Based on the framing charts shot by production the pulls facility scales the frames to a common working resolution prior to delivery to the VFX vendor. The pulls facility should deliver all necessary framing charts to the VFX vendor. We will reference these charts along with the production’s specifications to verify correctness.
A VFX Round Trip should be performed with all of the above to ensure that everything is working according to the specifications decided on by the production and imaging teams. VFX will return a proxy movie “VFX Quicktime” made from the EXR sequence, applying any provided show look and/or shot grade to bake the color into the proxy movies in Rec.709. This will be compared to the Reference Quicktime sent from editorial to ensure an exact match in color and framing. The following video from Netflix Studios provides a nice overview of the process and why it’s important:
Additionally for VFX work that includes CG:
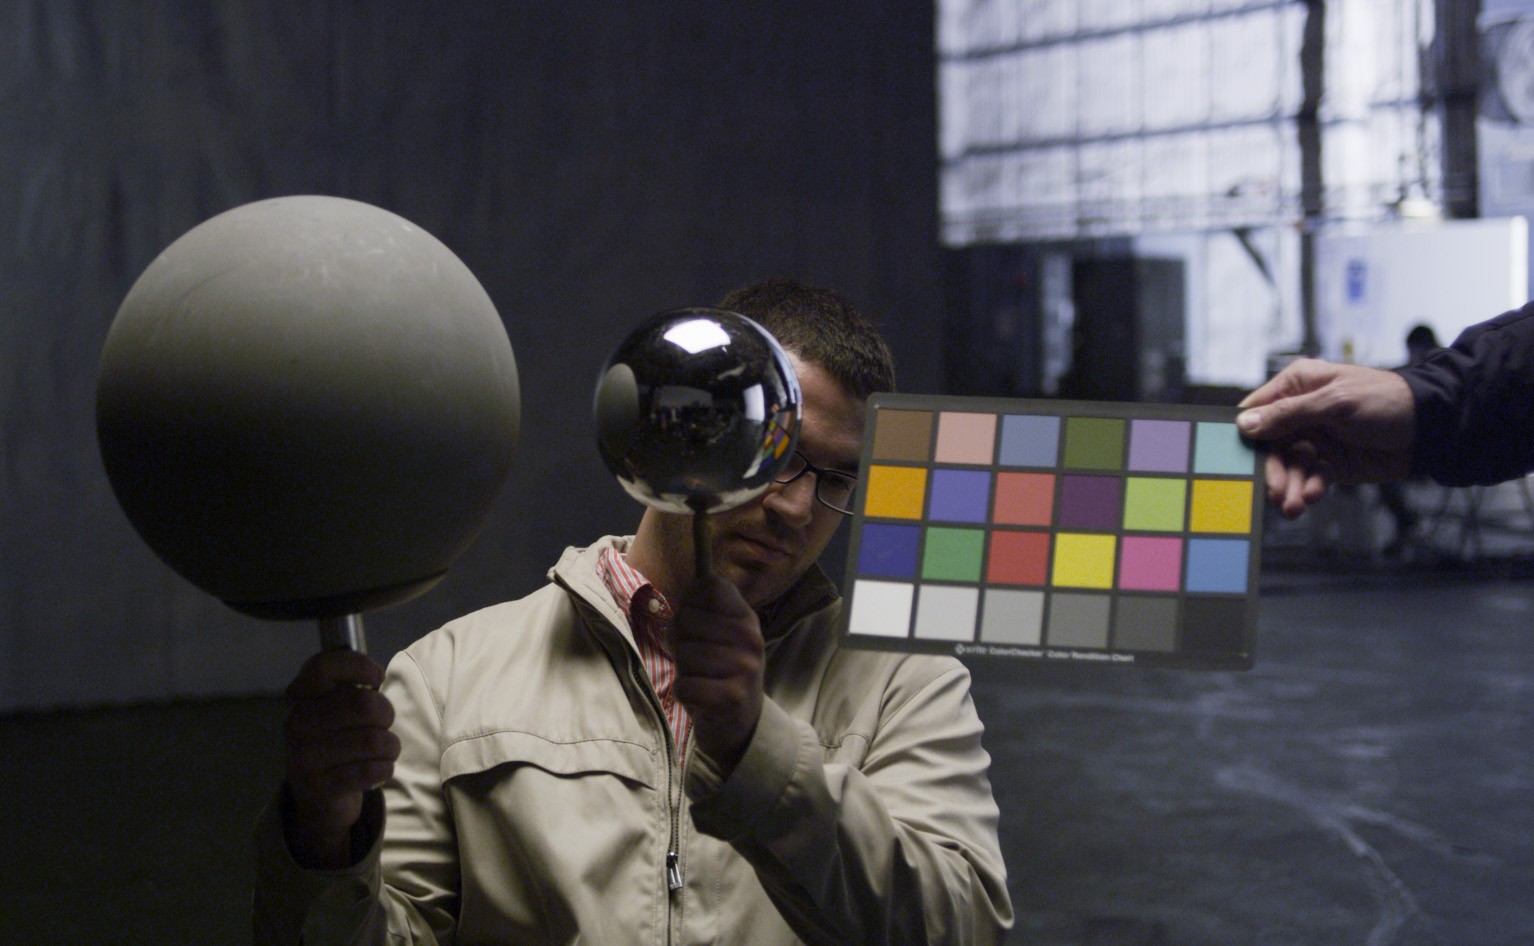
- Macbeth Color Checker and Chrome and Grey Balls When integrating CG into a shot it’s helpful to have a frame for the shot with a MacBeth color checker. This is used to calibrate our CG render’s color gamut to match the white balance and color characteristics of your camera. Likewise When integrating CG into a shot it’s important to have a frame for the shot with a chrome ball and a 18% Grey Ball. This is for matching the lighting of the CG to the shot.
- HDR Panorama capture Even better than a chrome ball is a capture of and HDR panorama. Here’s the Weta Digital IBL Video that covers the process for capturing HDR panoramas used for image based lighting (IBL).
VFX Delivery
VFX can deliver two types of files:
- High resolution ungraded OpenEXR files with VFX added are sent to DI for the final color grade and finishing.
The EXR files are returned to DI in the same interchange format they were received: ACES2065-1 AP0. -
Proxy media to editorial for inclusion in the offline edit.
The ACES transform (as well as any client provided shot LUTs) are baked into the proxy media in the color space of the reference monitor used by editorial (typically Rec.709 with Rec.1886 gamma). Editorial should provide proxy media format requirements to VFX. There are a number of options here: - ACES 1.0 SDR (Rec709) This is the standard ACES Output Transform for a Rec709 display.
- Low Contrast Look The ACES look with lowered contrast of 0.85 using an ASC-CDL transform.
- ARRI ALF-2 Look (Rec709) An emulation of the ARRI camera DRT of the same name. This is applied as an LMT so that the show remains ACES compliant.
- ARRI K1S1 Look (Rec709) An emulation of the classic ARRI camera DRT of the same name. This is applied as an LMT so that the show remains ACES compliant.
- ARRI RED IPP2 Look (Rec709) An emulation of the RED camera DRT of the same name. This is applied as an LMT so that the show remains ACES compliant.
- Sony S-gamut3 Cine Look (Rec709) An emulation of the Sony camera DRT of the same name. This is applied as an LMT so that the show remains ACES compliant.
Regarding the above four camera Looks (ARRI ALF-2, ARRI K1S1, RED IPP2, Sony S-gamut3 Cine), it is common in many larger productions to use ACES for input and interchange format, but to not use the ACES output transform, instead preferring to use the DRT (display rendering transform) of popular camera vendors such as the ARRI K1S1. This is done by inverting the ACES output transform, essentially disabling it, and replacing it with the camera DRT.

This is problematic as it defeats one of the core goals of the ACES project. Instead the intended workflow is to use a Look Transform in front of the ACES output transform which modifies it to look as desired.

This is exactly what these four camera Look transforms do, meaning clients can have the desired look of the K1S1 DRT that colorists love to grade with, and still have the show remain ACES compliant. With that in mind, we can supply all of the these camera DRT Look Transforms as CLF and DCTL files for use in an ACES workflow in programs such as DaVinci Resolve.
Offline Edit
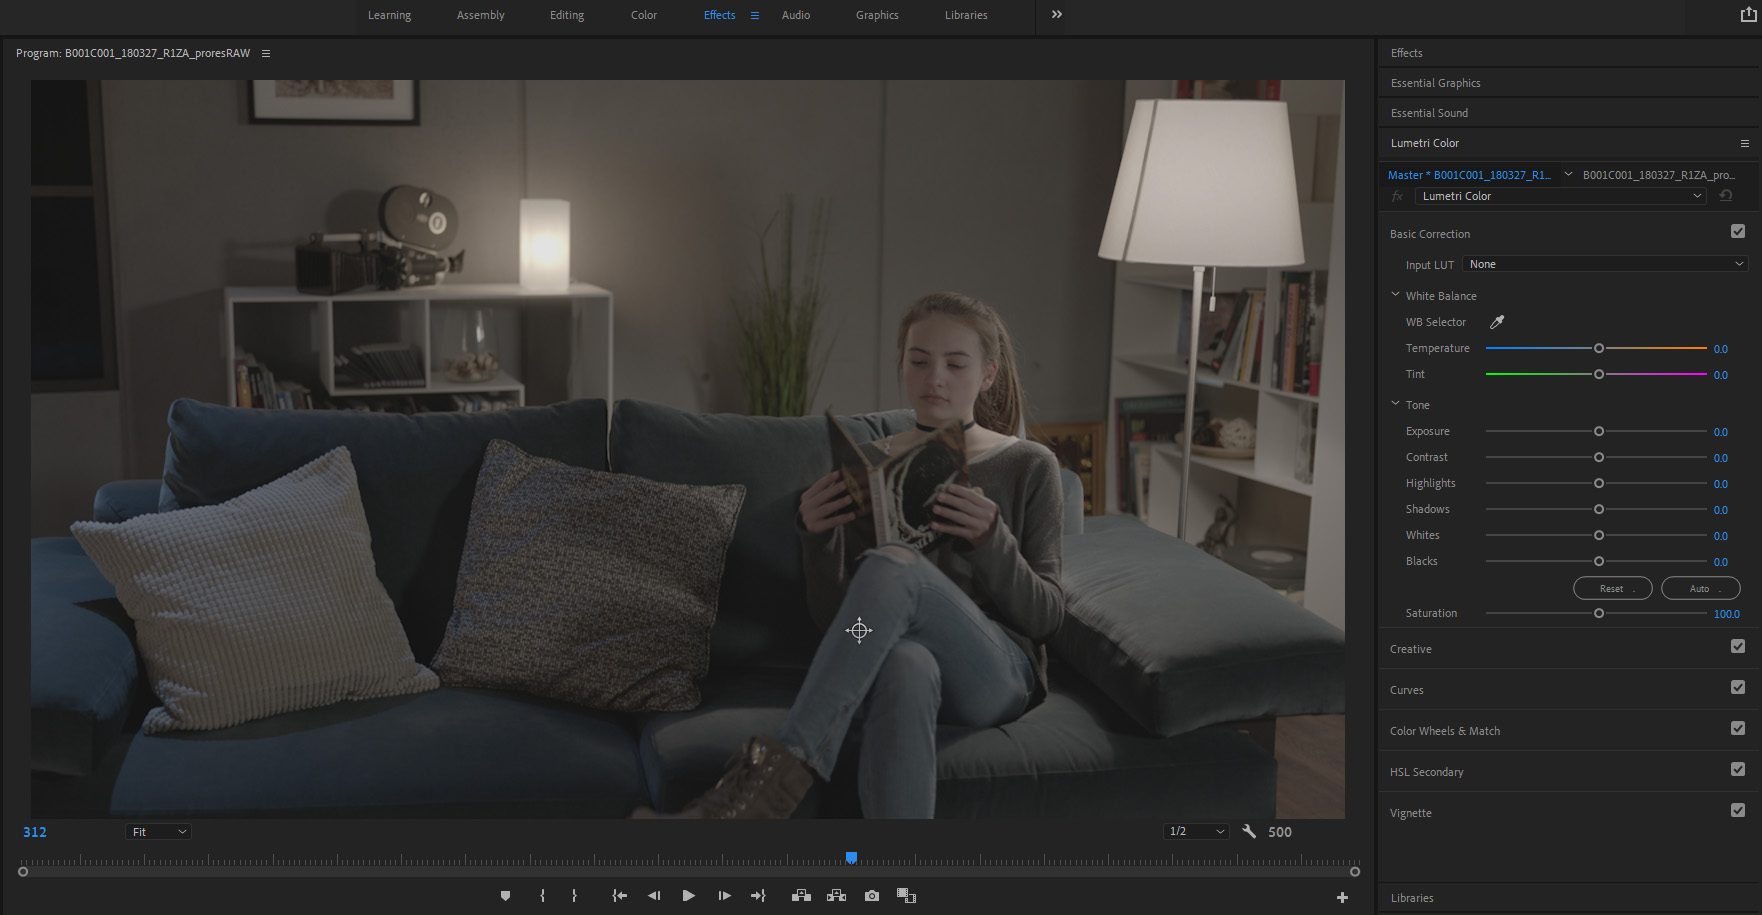
Many editing programs (for example Premiere Pro) lack the ability to properly process and display these scene-referred files. This is the case both for the final EXR files from VFX as well as for the source Camera native log files. For example, this is what footage from an ARRI camera looks like in Premiere. Note the washed-out look. This is because Premiere is incorrectly displaying the image in its camera native log color space.
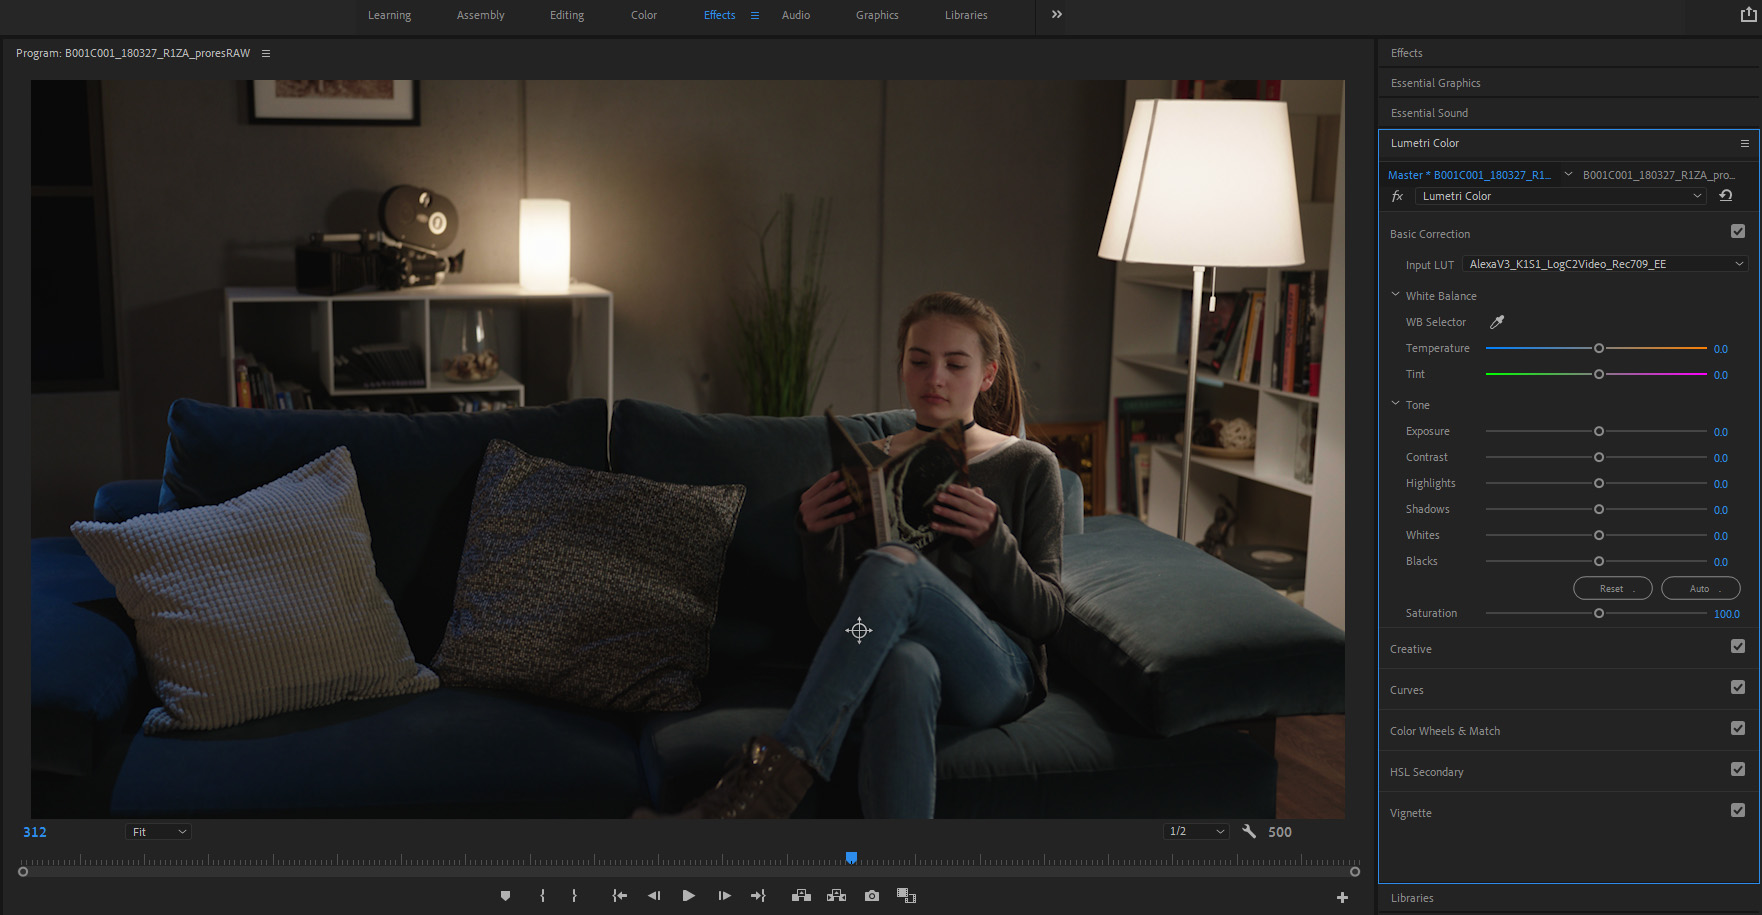
Images encoded in log are not meant to be viewed that way, rather log is a method to efficiently store the full dynamic range of the image as discussed above, similar to the purpose of a photo negative. Just as one is not intended to view a negative, one should not view a log file (nor should one view a scene-linear EXR). Rather these scene-referred files need to be “digitally developed” i.e. viewed with the appropriate DRT for the target display device. For example, below you can see the way the image looks with the ARRI classic K1S1 DRT for Rec709 applied to it.
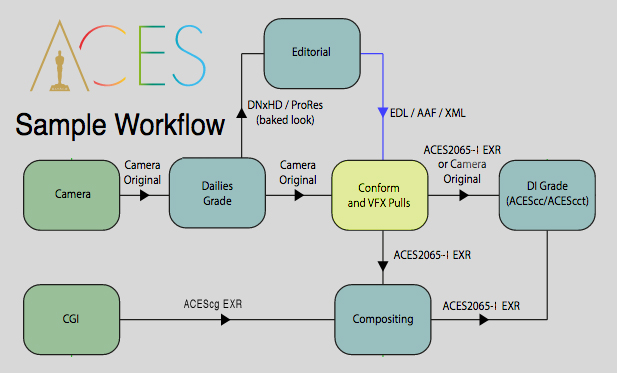
For this reason, a preferred workflow for Premiere is an offline edit. This involves the shots from set dailies being written out from a program like DaVinci Resolve as display-encoded proxy media with the look baked into them, and for these to be sent to (offline) editorial. Typically this would be Prores or DNxHD files in Rec709 color space, which is the standard for broadcast HDTV. Editorial works with these proxy files, allowing everyone to view the files as they were intended to look in editorial, which of course is important for editorial as the color affects the emotional mood of the film. Friends don’t let friends view their camera footage in log! Later in the conform these proxy files are swapped out for the camera RAW files as well as the EXR files from VFX for finalling. This workflow is shown in the diagram below. The advantage of this workflow is that it preserves the image integrity of the master, while allowing filmmakers to view their movie as they intend for it to look throughout every stage of the filmmaking process.
If you are not using this offline edit workflow or otherwise need help in how best to integrate ACES into your existing image pipeline, we are happy to discuss options with you. One possibility, for cases where the camera RAW files are being read directly into Premiere and viewed in log, is to provide a LUT to view your camera log footage through the ACES Output Transform chosen for the VFX proxy media. Note that this is again intended as an alternate way to view the media in the (offline) edit preserving artistic intent, and not as a substitute for proper color grading.