Photoshop
There is a free OCIO plugin for Photoshop. To install just put the file in the Photoshop plugins folder and it will appear in the filter menu. This lets you apply OCIO transforms as a filter, baking it into the file, which is a destructive workflow and thus undesirable. What you can do with the plugin however, is write out ICC profiles.
This config contains ICC profiles for all of the Look Transforms for the various workflows, which are described below. These ICC profiles are located in the software/Photoshop in the config. To install the icc profile on Windows, right-click the file and choose install profile. On a Mac copy the profiles into the /Users/[username]/Library/ColorSync/Profiles folder.
EXR Files in Photoshop
Photoshop has a very limited toolset in 32 bit mode (meaning most of your favorite tools in Photoshop wont be available). So if you’re wanting to edit scene-linear EXR files, a better option may be Krita, which is free and works with OCIO.
Alex Fry has provided a workflow for EXR files in Photoshop:
Open an ACEScg exr in photoshop. Assign an ICC profile to change the color space to ACEScg:
Edit > Assign Profile > “ACES CG Linear (Academy Color Encoding System AP1)”
(Note that if you instead pick “ACEScg ACES Working Space AMPAS S-2014-004” you will need to uncheck “Compensate for Scene-referred Profiles” in Edit > Color Settings)
Then use a LUT to view with an ACES Output Transform: Layer > New Adjustment Layer > Color Lookup > Load 3D LUT and load the .csp LUT from the config’s software/Photoshop folder. These .csp LUTs are all updated for the ACES 1.2 Output Transform (the one from Alex is for ACES 1.0.3).
If you are saving the file as EXR, make sure to first disable the LUT, otherwise it will be baked into the file.
Matte Painting DPX log footage
Let’s assume that we are beginning with a 10-bit Log DPX film plate in ACEScct color space that you will be adding your matte painting to. Photoshop will read this in 16-bit integer mode displaying the log image in raw which will look washed out:
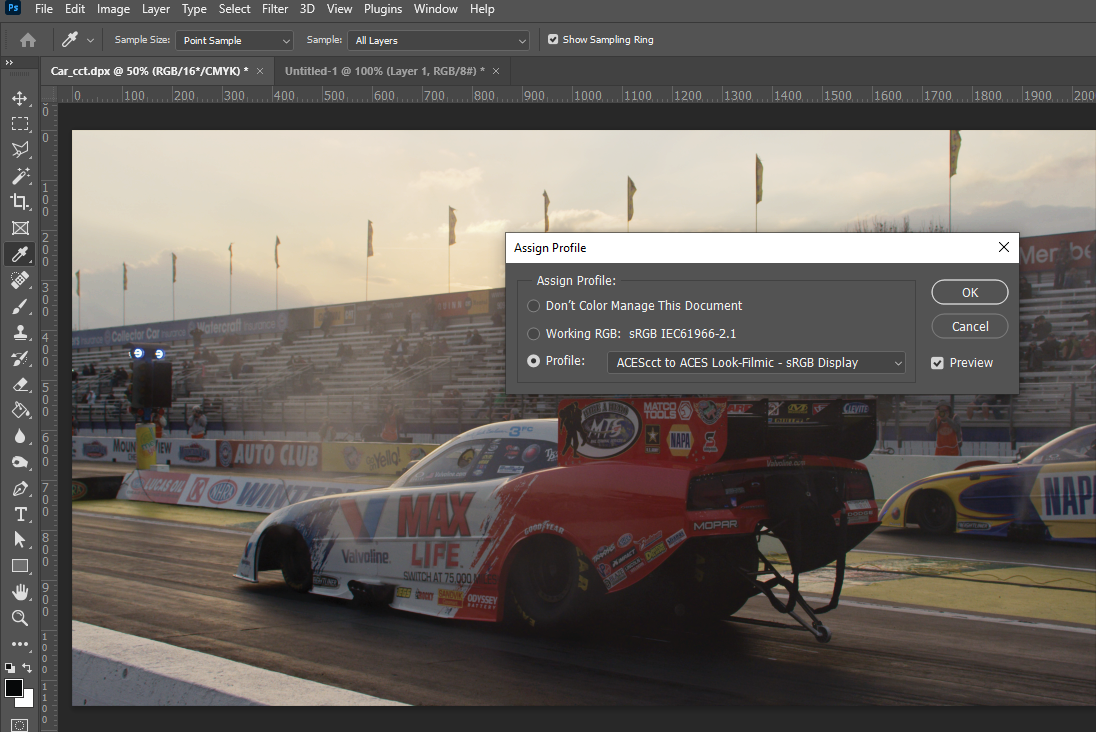
Next, we need to assign our film emulation profile to our Log file so it will display properly. Select the menu option edit > assign profile and in the window that opens, select the profile from the drop-down menu to convert from ACEScct to the desired display (in this example Look-Filmic - sRGB Display). This displays the log image properly.
To toggle the profile on and off, first disable it with view > proof setup > monitor RGB. You can then use the ctr-Y hotkey (view > proof colors) to toggle the profile display on and off. You’ll want to toggle between the two views frequently while painting, especially when painting darks.
Note that if you wish to paste an sRGB image such as a PNG or JPG from a digital camera or from the web into the matte painting, it will need to first be converted to ACEScct log space. The easiest way to do this is in Nuke.
The file can be saved in PSD format while working, and will embed the ICC profile information into the file. For delivery to comp, all layers should be flattened and saved as DPX. This gives a DPX roundtrip from Nuke to Photoshop and back.
Painting sRGB Texture Maps
If you need to paint a texture map in Photoshop, it’s good to see how it will appear through the display transform for a WYSIWYG workflow, just as you can in a 3D paint program like Mari or Substance Painter.
Similar to the matte painting workflow above, this can be done by applying an ICC profile to the image. For example
software/Photoshop/ACES sRGB texture to LMT-Neutral - sRGB-Display.icc
The file can be saved in PSD format while working, and will embed the ICC profile information into the file. For publishing textures, all layers should be flattened and saved as PNG.