Sp2M: Substance 3D Painter to Maya (Arnold)
Tool to automatically connect Substance 3D Painter textures to Maya shaders. Based on the original script by Tristan Le Granche. This version has been updated for Python 3 (required for Maya 2022 and up), and has added functionlaity described below.
Here’s a demo of the script in action. Below are details about principles and functionality.
Naming Convention
The script works by parsing the texture maps in a folder based on a defined naming convention, and then assigning these found maps to their corresponding shaders. For example say we have the following naming for a texture map:
[shaderName]_[mapType]_[assetName]_[artist]_[version].[ext]
There are two parts of this file name we need to identify. The shader name and the map type. For example, the bump map for the hubcap shader would be hubcap_bmp_car_dflood_v01.exr*
Shader Name
This needs to match the name of the shader assigned in Maya. In Substance this is referred to as a “textureSet” (called with the $textureSet variable in Output presets). That is, the names of the shaders assigned to a model in Maya become the “texture sets” when the FBX is imported into Substance Painter. The script will find texture maps containing this name and assign these to the shader with the same name in Maya.
Because the program parses the texture name to identify patterns, best practice is to name your shaders as one word without underscores. For example “shoeLace” rather than “shoe_lace.”
Map Type Name
The texture map type name. In the case of our school’s naming convention, we use a 3 letter code (dif for diffuse, bmp for bump, and so on). The script recognizes several names for the map type, listed below. Based on these names in the texture file name the script will know where to connect the map to the shader in Maya.
| map | name |
|---|---|
| diffuse/base color | ‘dif’, ‘baseColor’, ‘BaseColor’, ‘basecolor’, ‘color’, ‘Color’,’albedo’, ‘Albedo’, ‘diffuse’, ‘Diffuse’, ‘diff’, ‘Diff’ |
| bump/height | ‘bmp’, ‘height’, ‘Height’,’bump’, ‘Bump’, ‘BumpMap’, ‘bumpMap’ |
| metalness | ‘met’, ‘metal’, ‘Metal’, ‘metalness’, ‘Metalness’, ‘metallic’, ‘Metallic’, ‘mtl’ |
| specular roughness mask | ‘spc’, ‘ruf’, ‘roughness’, ‘Roughness’, ‘specularRoughness’, ‘SpecularRoughness’, ‘specular’, ‘Specular’, ‘spec’, ‘Spec’, |
| layer mix | ‘lyr’, ‘Layer’, ‘layer’ |
| normal | ‘nor’, ‘normal’, ‘Normal’, ‘normalMap’, ‘NormalMap’, ‘nor’ |
| displacement | ‘dsp’, ‘displace’, ‘Displace’, ‘Displacement’, ‘displacement’, ‘displacementMap’, ‘DisplacementMap’, ‘disp’ |
Exporting Texture Maps
The exported texture files must contain the shader name and map type in the texture file name. In Substance Painter this is included in most Output templates through the $textureSet variable (for the shader name). For our recomended workflow the provided output template will create maps for color, bump, metalness, and specular roughness masks. Layer masks being less common are output manually. See the Substance tools help for details of this workflow.
Given all of the above, what works well with Substance Painter, especially as a way to get versioning on the texture maps, is to name the Painter file itself with asset_artist_version, and use the following variables in the Output Template (here for the bump map)
$textureSet_bmp_$project(.$udim)
So if the Painter file was named “car_dflood_v01.spp” the bump map texture would be “hubcap_bmp_car_dflood_v01.exr”
Exporting Textures from Other Programs - Mari, Zbrush, Photoshop
As long as the names follow this naming convention they can be exported from any program: Photoshop, Mari, or even Zbrush for a normal or displacement map derived from a sculpt.
Normal and Displacement Maps
Normal and Displacement maps are not included in our Substance texture export template. This is because only a modeling program like Zbrush can derive a displacement or normal map from a sculpt. Paint programs like Substance or Mari cannot because they are not modeling programs. Substance or Mari when they generate a normal map are simply converting a 2D hight map into the normal map format, not deriving it from a 3D sculpt. The same is true for displacement maps in Substance which are simply height maps (i.e. bump maps) used as displacement, as opposed to a displacement map derived from a sculpt.
Using the GUI
The script is included in the custom Maya shelf.
![]()
Click the shelf button to launch the GUI.
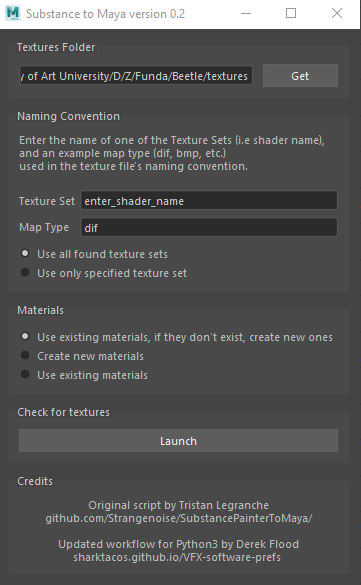
Here’s a description of what the above fields and options are for
Textures Folder
This will default to the texture directory defined in your Maya project settings. If your textures are in a sub folder, you can navigate there.
texture set/shader name
Enter the name of one of the textureSets (i.e. the shader name) included in your texture’s file name corresponding to the name of the shader. An easy way to do this is to copy-paste the shader name from the attribute editor into this field in the GUI. You only need to enter one texture set and the script will find all the others.
map type
In the third field put one of the texture map types you have. By default the “dif” map is selected referring to a diffuse map (base color). Assuming you are using this naming convention of “dif” for your diffuse map you can just leave this as is.
Options
- Use all found texture sets
- Use only specified texture set
These will either apply just the shader you entered in the “texture set/shader name” field above, or apply all the shaders it finds.
- Use existing materials, if they don’t exist, create new ones
- Create new materials
- Use existing materials
This last option is the default behavior. It conects textures to the existing materials, and then runs the “delete unused nodes” mel command from the Hypershade to clean up any orphaned nodes.
Launch button
Click the “Launch” button and the script will search your textures for matches. This will open the second panel, shown below, where all the texure matches are listed.

Select the desired options, and click the “Proceed” button. If you have the (default) option “use all found texture sets” the script will assign the texture maps to all the shaders it finds. If you only want to assign textures to one shader use the “use only specified texture set” option.
Detect Flat Color Texture Maps
Substance Painter exports all texture map types in the output template, regardless of whether they have been painted. It is of course undesireble and confusing to have, for example, a bump map connected to a shader that does nothing because it is unpainted. To address this, the script parses the texture maps to detect for flat solid color (all pixels have the same value) or for zero value (all pixels are black). It will then do the following depending on the texture map type:
- BaseColor/diffuse and SSS maps
No detection. These are connected, but the mipmap created bymaketxare only a single tile (8x8 pixels) to save memory. - Metalness maps
No detection. These are connected, but the mipmap created bymaketxare only a single tile (8x8 pixels) to save memory. - Bump & Normal maps
If detected will not connect the flat texture map, as it will have no effect on the shader. - Spec roughness maps
If detected will not connect the flat map and correspronding spec mask network (see below). The roughness slider value remains at its default settings. - Layer Mask Maps
No detection. Because these are exported manually, it is assumed you are not exporting an empty map.
Delete Flat Texture Map Files
Option to delete the unused flat texture map files from disc. Defaults to unchecked.
Flat Detection of EXR textures
The script requires imageoio to perform flat detection of OpenEXR files. If you do not have this installed (the script will display a message telling you) it’s easy to do by entering the following mayapy command from a terminal:
mayapy -m pip install imageio
The freeimage plugin required by imageio to read EXRs is included in this repo and set to work with Windows OS. If you are on a MacOS you can edit the Maya.env file to point the variable to the MacOS plugin.
# Imageio freeimage plugin for Windows OS:
IMAGEIO_FREEIMAGE_LIB = %MAYA_APP_DIR%\scripts\SubstancePainterToMaya\imageio\freeimage-3.15.1-win64.dll

# Imageio freeimage plugin for Mac OS:
# IMAGEIO_FREEIMAGE_LIB = $MAYA_APP_DIR/scripts/SubstancePainterToMaya/imageio/libfreeimage-3.16.0-osx10.6.dylib
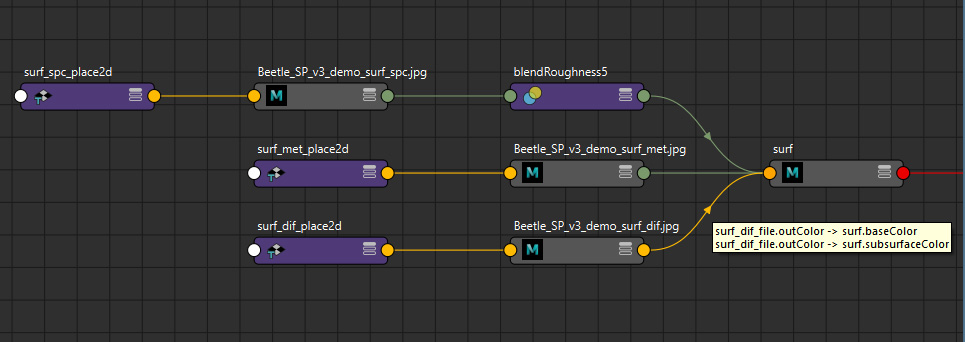
Color maps multiple inputs, and default shader settings
The color map is connected to both the base color and the subsurface color. This allows you to paint one color map in Substance Painter, and saves on disc space as well. Since the subsurface weight on the AiStandardSurface is set to zero by default, if you wish to use sss you just need to turn the subsurface weight on (and the base color weight off).
Additionally the following attributes are set on all the aiStandardSurface shaders, providing an optimal starting place:
- specular weight: 0.5
- transmit AOVs: on
- subsurface radius: 0.15, 0.008, 0.008 (blood red)
- subsurface scale: 0.1
- subsurface anisotropy: 0.8
Specular Roughness mask network
While color, bump, and metalness texture maps are connected directly to the shader attributes, specular roughness maps are instead made with an alpha mask which is exported through a custom user channel. The black and white values of this mask are then remaped to two roughness sliders (color1 and color2 shown in the Attribute Editor below). This provides artistic control, rather than having the roughness slider locked off with a texture map.
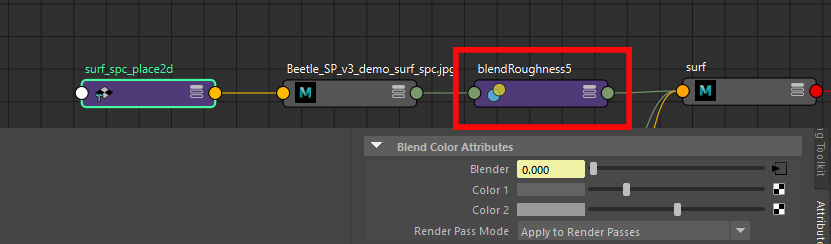
Note that this workflow is also included in the roughness section of my “UberShader” Smart Material included in the Substance tools. The technique is also demonstrated here:
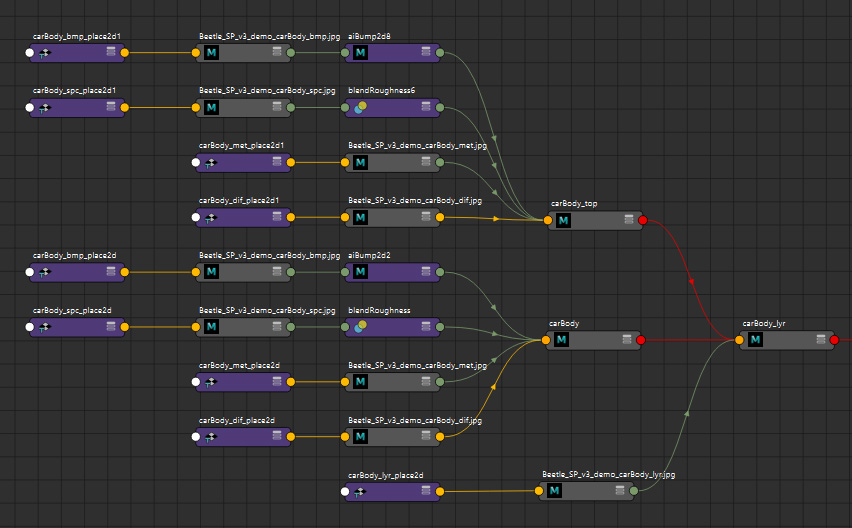
Layer Shader network option
If a layer map is found (naming: ‘Layer’, ‘layer’, ‘lyr’) the aiStandardSurface shader is duplicated with all of its input connections, and these two shaders are then connected to a layerShader. Finally the layer texture map is input into the layer mix.